Towel-drying, air-drying, and blow-drying wet hair each have their own unique benefits, but there’s one thing they all have in common: The potential to cause damage when approached incorrectly because unfortunately, hair is at its most fragile state when it’s wet.
While there are few right or wrong ways to dry your hair (this choice will depend on factors like hair type, texture, and styling goals), there are some tips to optimize your technique as a way to minimize frizz and unnecessary damage to your hair.
Towel-Drying Techniques
Towel drying is a great option for hair types that tend to run on the dry side or has issues retaining moisture for long, often due to having a finer density or existing color-treatment. Towel drying is a wonderful method for those needing help getting their hair dry in a shorter time frame. So, how does one approach towel drying correctly?
Squeeze, Don’t Rub
You want to gently squeeze out the excess water instead of rubbing it vigorously. The friction caused by you rub the hair can cause it to break or worse, get pulled out. Our hair, no matter the shape, length, or density, is at its most vulnerable and fragile state when it’s wet. So be kind 🙂
Choosing Absorbent Materials
Choosing just any towel could be the primary culprit for your hair’s frizzy results. Instead, have a dedicated hair cloth made with an absorbent material, such as a cotton t-shirt, or better yet, microfibers. The benefit of using a microfiber towel is it’s amazing ability to absorb water, faster. These work especially well for thicker hair types that tend to retain moisture longer.
If your hair doesn’t maintain as much moisture, cotton t-shirts will safely absorb the excess. T-shirts have a flat surface, so the lack of added texture against your strands won’t rough up the hair as much as your average, textured bath towel, resulting in less-frizz.
Air-Drying Techniques
Air-drying may be your method of choice if you, or your hair, need a break from your day to day heat styling. It also comes in handy when your short on time and while it might seem impossible to incorrectly air-dry your hair, there are ways to do it more efficiently and effectively.
Shake It Out
Giving your hair a quick shake can go a long way when it comes to air-drying, especially before and after applying the styling products that compliment your hair type. Shaking your hair out allows air to move throughout your strands, promoting faster-drying results, as well as a little bounce. If volume is something you seek, flipping your head upside-down and shaking it out can help do just the trick!
Even though the intent is to air-dry which does need the application of heat, a heat protectant can still prevent breakage and provide a soft, nourishing finish to air-dried hair and in some cases (or products), can provide protection from the sun if it contains an SPF such as the *Huile Sirène Hair Oil Mist by KÉRASTASE. This is especially important for those with color-treated strands because it helps your hair from fading to those unwanted tones, providing color longevity, shine, and nourishment.
Use a Wide-Tooth Comb
Wide-toothed combs are a great option because they don’t cause as much strain on wet, fragile hair. Similar to the shake-out technique, a wide-tooth comb helps infuse the hair with air by gently separating your strands, therefore speeding up it’s drying time. If your preference is to air-dry, but you still have some tangles to get through, this is the approach to take. Extra fine hair that’s high in volume (or as I like to say, “when there are a lot of skinny trees in the forest”) might even need to consider using a leave-in detangling spray like the 7 Seconds Detangler by Unite, prior to combing through. This helps avoid pulling on your already fragile strand, resulting in breakage. Here are some great options of wide-toothed combs at all price points https://www.allure.com/gallery/best-wide-tooth-comb.
Blow-Drying Techniques
When heat’s involved, it should come as no surprise that extra attention and care are of the utmost importance, or at least should be. Heat can be a source of serious damage to the hair when done incorrectly, especially with prolonged use, high heat, or frequent exposure. The benefits of a good blowout are hard to pass up, and when done correctly, offer a desired hairstyle and appearance that could last for up to a week.
Before I get into the specifics of maintaining better hair health, let’s go through 5 basic steps:
- Begin with semi-dry hair: Use one of the above techniques to get your hair at least 60-70% dry before taking the dryer to it. This helps significantly minimize the heat needed to dry the hair. Less time = less heat and damage.
- Detangle and protect: Use a good leave in conditioner like one of my faves, the *”7 Seconds Detangler by Unite” because it’s a perfect, lightweight base for just about any hair type. A Paddle brush can be your hair’s best friend because they’re designed to help detangle as well.
- Apply styling products: Find out which products help you achieve your desired end result and apply those prior to heat styling. Choosing the right products can help you eliminate the need for a secondary tool like a flat iron after blow drying. In my other blog, I have 3 hair quizzes that can help you do just that!
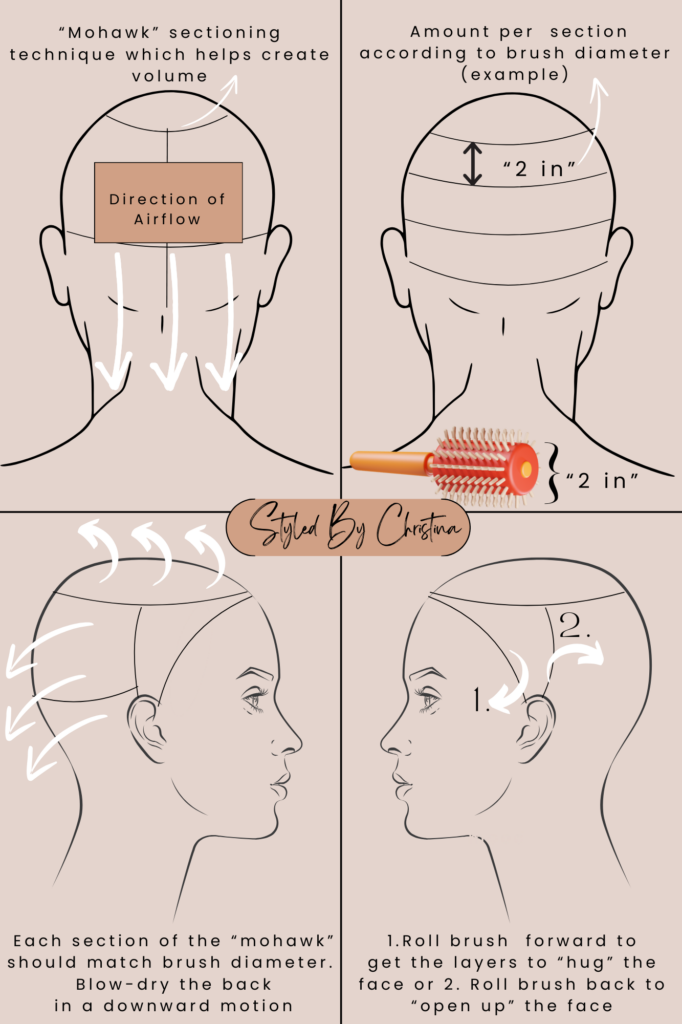
- Section the hair: In order to create an efficient blow dry, work in sections, clipping them out of the way, and be sure when sectioning your hair, the amount of hair per section does not exceed the diameter of your round brush. You can find some great clips like these Conair Alligator Plastic Salon Clips – All Hair – Pink – 4pcs : Target. For example, if I’m using a round brush that is 2 in in diameter, the height of my sectioning should only be 2 in.
- Grab your tools: Try using a hairdryer with negative ion technology, your preferred dryer attachment (nozzle, comb, or diffuser), and the brush of your choice. Here’s just one of many great options: Dyson Hair Care | Sephora
Example:

Directing Airflow
Heated coils from inside the dryer along with powerful hot air can leave your hair damaged so directing the airflow from your blow-dryer is critical if you want to maintain good hair health, minimize drying time, and achieve your desired styling goals. Concentrating the heat will help seal the cuticle layer (the outer most part of the hair strand itself) and leave you with silky smooth hair, with little to no damage. Always remember to apply a heat protectant such as the *Unite Silky Smooth Heat Activator Seal.
After detangling, directing your air-flow in the same direction your hair grows (pointing the nozzle down from roots towards the ends). This will keep you from roughing up the cuticle, which can cause frizz and expedite color-fading. Using an attachment is key for directing a concentrated air-flow. Your chosen attachment will depend on your what you’re attempting to achieve: A nozzle can be used for basic drying or round brush, and a diffuser (or mesh strainer) will enhance waves or curls while cutting down the frizz factor.
Your nozzle doesn’t need to touch the hair for it to work. This is a common mistake that most often happens with nozzles and round brushes. The closer the nozzle is to the hair, the more damaging it can be. If you seek volume, direct the hair and air-flow up and away from the roots. If you’re looking for smoother results, tension is a must. For curly hair types with baby hairs, I suggest starting at the hairline or right around the face where they dry the fastest, so you can smooth out those bad boys that always seem to get frizzy first. The use of a texturizing spray like the *Unite BOOSTA Volumizing Spray will help maintain all of that hard work, for the remainder of the day.
Diffusing
Diffusing requires a specific technique that isn’t as straightforward as a nozzle or comb attachment.
- Semi-dry using the “plop” method: Again, the goal with this first step is to reduce how much heat you’re putting on your curls. Essentially, you’ll flip your head upside down, plop your hair into a cotton t-shirt or microfiber towel, and tie or wrap it around your head. This towel-dry method helps curls find their shape and spring before setting with heat and without interrupting your hairs natural curl pattern. The more your curl is raked thru with a comb, the more disturbed it gets and once you’ve disrupted that natural curl pattern, not only is it hard to recreate, but your hair will definitely let you know how unhappy it is!
- Diffuse the hair upside down: Using the *”low and slow” heat setting, start underneath the hair at the nape by flipping your head over. The goal with lowering the heat is to minimize frizz. By diffusing upside down, the heat will be directed more towards the root area, drying hair against the pull of gravity, resulting in full, bouncy, happy curls.
- Apply finishing product. Once your curls are dry, apply a finishing oil for some extra shine and to help tame frizz. This will also create a barrier between the hair and humidity, which will retain natural moisture, while keeping away unwanted elements that cause frizz.
*Remember: When it comes to temperature “slow and steady wins the race” as I like to say. The diffusing process takes time, but the low heat paired with low airflow make for the bounciest, shiniest, and most successful curls. Use that cool shot button on your dryer to finish it all off. Have you ever wondered… “what on earth is this cool button for?” Well, that’s because heat helps shape and manipulate the hair while cold or “cool”, tells it to stay put and stops that manipulation process, creating shine, locking in color and keeping the hair calm. Curly hair is at it’s happiest when there’s cold air and low humidity, so this is a great way to help recreate that effect.
Managing Heat
No matter what attachment or technique you’re using to dry your hair, managing the source of your heat and its levels will make or break your hair’s health. Choose a dryer that uses ion technology when possible like the T3 AireLuxe Hair Dryer. Negatively charged ions help breakdown the water molecules in wet hair, converting them to microparticles, making it easier and faster to dry.
If you use the towel-drying or air-drying methods mentioned above to get your hair at least 60-70% dry, you can start your dryer on a low-medium heat setting and still get lasting results. If you have fine, dry, or damaged hair, staying between 200-300 degrees is recommended. For medium textured hair, don’t exceed 350 degrees. Very thick and coarse hair may need a heat setting between 350-400 degrees, so these hair types, in particular, should never start with fully damp hair.
I hope all of this has been helpful. Happy hair journey!
-Christina P.
Styled By Christina Product Links:
https://www.kerastase-usa.com/special-offers.html
UNITE Hair Care – Professional Salon Systems – UNITE HAIR
Conair Alligator Plastic Salon Clips – All Hair – Pink – 4pcs : Target.


Hi tyere it’s me, I am also visiting this web site regularly, this
wehsite is genuinely nice and the users are truly sharing good thoughts. https://bandur-Art.blogspot.com/2024/08/the-ultimate-guide-to-no-mans-sky-mods.html
Thank you so much!
Greetings! Very helpful advice within this article!
It is the little changes which will make the largest changes.
Many thhanks for sharing! https://Lvivforum.pp.ua/
Excellent website you have here but I was
curious about if you knew of any discussion boards that cover the same
topics discussed here? I’d really love to be a part of online community where I can get responses from other experienced people
that share the same interest. If you have any
suggestions, please let me know. Cheers!
Absolutely! Reddit is a really great place to start. I’d be more than happy to get you the discussion group I recommend the most
Yes absolutely! Reddit is a great source for such discussions. I’d be happy to check with the site to see which group may best suit your needs!
I was excited to find this site. I wanted to thank you for your
time just for this wonderful read!! I definitely appreciated every
part of it and I have you book-marked to
look at new stuff on your website.
Wow, thank you so much for this. I’m so glad this is helpful for you.